Chef Increase Version in Inspec.yml Uploads Same Profile Twice
[edit on GitHub]
Note
This documentation covers Chef Automate's IAM characteristic in release 20200326170928 and afterward.
This guide shows you how to perform important administrative operations. You will add together members to Chef-managed v2 policies, delete a legacy policy, and write a Team Admin v2 policy that lets a Team Admin manage their users and teams.
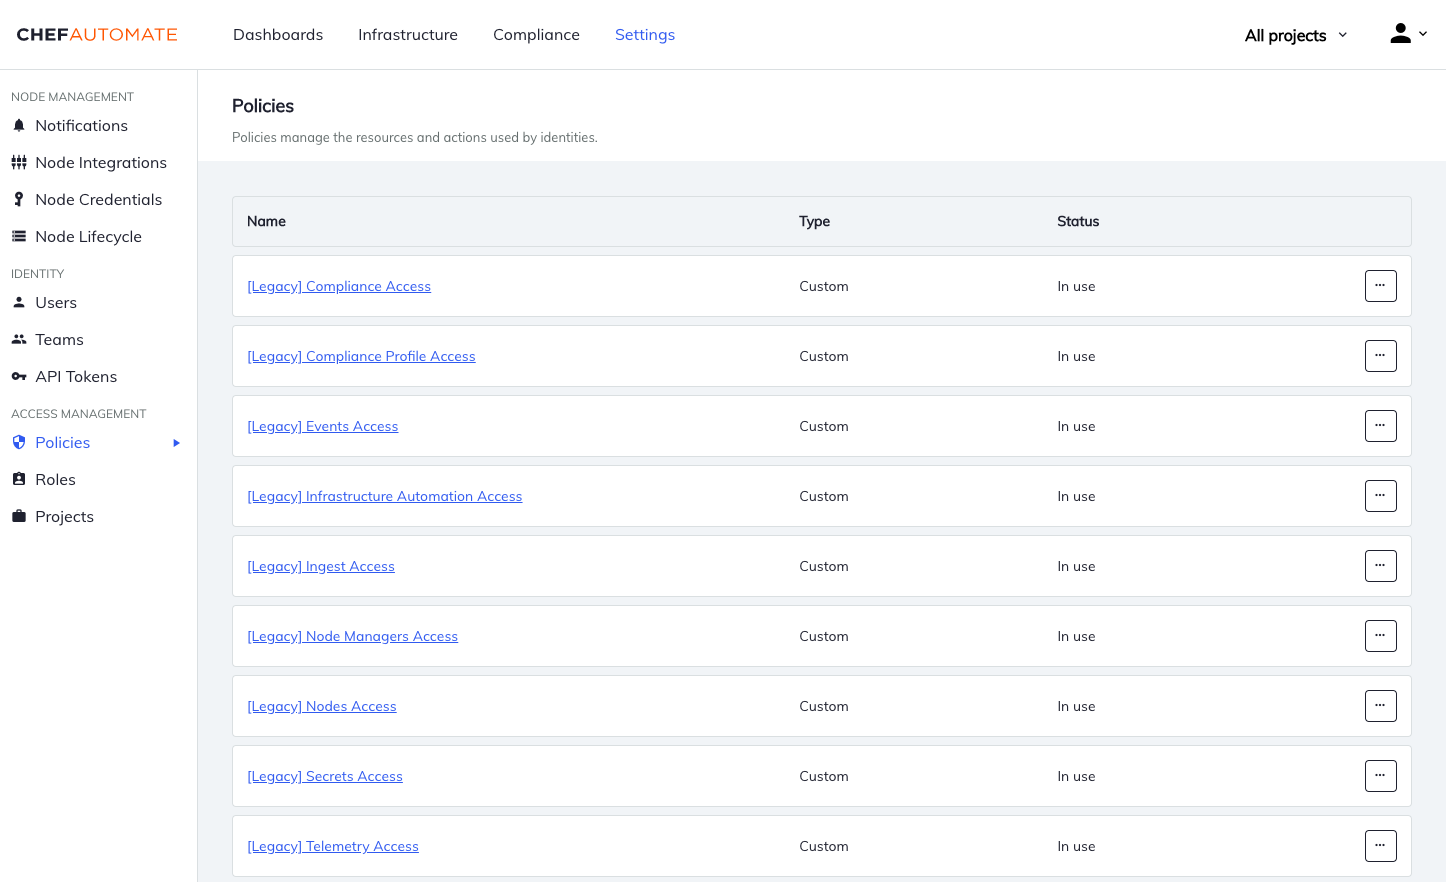
View Policies
After you take signed in to Chef Automate, select the Settings tab in the peak navigation bar, and so select and locate the Policies section in the left navigation.
In this section, you can view all of your v2 policies.
This policy display includes the following:
- New default, Chef-managed policies: Administrator, Ingest, Editors, and Viewers.
- Imported v1 default policies–at present called legacy policies–in the new v2 policy format and marked with the
[Legacy]prefix. - Imported v1 custom policies that y'all created, which are marked with the
[Legacy]prefix and a(custom)suffix.
Policy Conversion
If you started on IAM v1 and migrated your IAM v1 policies to IAM v2, so you should move whatever members of your IAM v1 legacy policies to the advisable IAM v2 policies, and afterwards, delete the IAM v1 legacy policies.
To delete a legacy policy, open up the menu on any custom policy, which is located at the terminate of the policy row, and select Delete Policy from the menu.
A warning appears if members are withal attached to the policy because deleting that policy disrupts access for all of its members. Even so, you volition nevertheless exist able to delete the policy.
The adjacent few sections explain how to use Chef-managed policies and how to create custom policies.
Using Chef-Managed Policies
In this case conversion, you volition create two local users and add them to default teams that are automatically included in default policies. Note that you lot could also add users directly to policies without the intermediate teams, but using teams tin brand managing your system more flexible.
Create Users
Follow the instructions on Creating Users to:
- Create a local user with the username
test_viewer. - Create a local user with the username
test_editor.
Add Users to Teams
Select Teams from the left navigation of the Settings tab. Three teams are provided by default: admins, viewers, and editors.
Follow the instructions for Calculation Users to a Team to:
- Add the user
test_viewerto the Chef-managedviewersteam. - Add the user
test_editorto the Chef-managededitorsteam.
Afterwards upgrading, those teams volition be role of the Viewers and Editors policies, respectively. The default Viewers policy is provided, and so you can rapidly grant read-only access to everything in Chef Automate, except for admin resources. Similarly, the default Editors policy is provided, and then you can quickly grant complete access to everything in Chef Automate, except for admin resources. In one case this step is done, the test_viewer and test_editor users may log in with appropriate system admission.
Creating Custom Policies
The Chef-managed policies give you a starting point for permissions. You may want to write more fine-grained policies, tailored to the demands of your organization. Defining your own policies must be done from the command line.
As an case, permit us say that yous, the admin, want to consul a portion of your tasks to a colleague, simply without granting them total admin access. In this example, you lot could create a policy chosen Team Devops Managers, which grants its members some–simply not all–administrative privileges. Create a JSON file in the editor of your selection. Post-obit JSON syntax, begin with the proper noun property.
See the end of this section for a complete JSON policy example
"proper name" : "Team Devops Managers" , The name field is for human consumption. When you desire to refer to the policy in commands, you volition need to know the policy's ID. Let us requite this policy the ID value: team-managers-devops.
"id" : "team-managers-devops" , Additionally, we can permission actions on this policy but like any other IAM resource by assigning it to i or more than projects. If nosotros leave the projects array empty, then we indicate the policy is unassigned. For example, anyone with permission to view unassigned policies can view this policy.
Let united states of america further assume you want user Bob as well as anyone on team gamma to exist authorized past this policy. This grouping comprises the members array, equally seen below.
"members" : [ "user:local:bob", "team:local:gamma", ], Next, you will specify the permissions themselves–which in IAM v2 are the statements– declared as an array. The statement allows us to specify the actions a user is permitted to take upon resources that accept been assigned to a project. The projects field on a statement is an array that may contain more one existing project, a wildcard * to indicate permission to resources in any projection, or (unassigned) to indicate permission to resources that have non been assigned to a project.
Note that the projects property in statements designates permission for the resources inside the statement (here, that is iam:users and iam:teams), non for the policy itself, and cannot be left empty. For more nearly projects, come across Projects in the IAM Guide documentation.
In this example, nosotros only need a single statement providing access to the get, listing, and update actions for users and teams that take been assigned to the projection project-devops.
{ "issue": "ALLOW", "actions": [ "iam:users:update", "iam:users:list", "iam:users:get", "iam:teams:update", "iam:teams:list", "iam:teams:become" ], "projects": ["project-devops"], }, Complete JSON Policy Case
{ "proper name": "Squad Devops Managers", "id": "team-managers-devops", "projects": [], "members": [ "user:local:bob", "team:local:gamma" ], "statements": [ { "effect": "Allow", "deportment": [ "iam:users:update", "iam:users:list", "iam:users:get", "iam:teams:update", "iam:teams:list", "iam:teams:get" ], "projects": ["projection-devops"] } ] } Salvage your JSON file and refer to the IAM Policies API reference to send that policy data to Chef Automate.
Policy Membership
Users, teams, and API tokens can all be policy members. Both users and teams can be either locally or externally managed with LDAP or SAML.
Local Users and Teams
Local users and teams are managed straight by Chef Automate.
To add or delete members, navigate to the Policies list in the Settings tab, and then select a policy in the list to open its details. Select Members to view the current membership. Use the Add Members button to open a list of candidate members. This lists all those local members (both users and teams) that are non members of this policy. If all of the local members are already included in the policy, and so this list will be empty. Select whatsoever members y'all wish to add to the policy. Use the Add together Members push button to complete the functioning. This takes you lot dorsum to the policy details, showing the revised membership list.
Member Expressions
Fellow member expressions are required for externally managed users, and teams, besides equally API tokens.
LDAP and SAML users' information is saved outside of Chef Automate. You volition need to manually enter the provider-qualified user or team. To do this, open whatsoever policy from the Policies list, then select Members. Select Add Members to open the listing of candidate local users and teams. Near the bottom of the page, select the Add Fellow member Expression push.
Notation
The member expression dialog box appears after selecting Add Member Expression and guides you through creating a member expression. This dialog box ensures correct syntax employ in a user-friendly way. The next few paragraphs explain the syntax if you lot desire to add members via the API.
Enter a member expression using the format team:<type>:<name> or user:<type>:<name>. Note that these expressions are case-sensitive.
- The
<type>expression is eitherldaporsaml. - The
<proper name>expression is the name of the user or squad that the external identity provider knows. For example, this is a valid fellow member expressionteam:ldap:editors_team_1, assuming theeditors_team_1squad is known by your identity provider.
Alternately, you may add all teams to a policy using a wildcard every bit the last term in the fellow member expression: team:ldap:* or team:saml:*.
The member expression dialog also supports tokens. You enter a token using the expression token:<id>. In social club to observe a token'due south ID, visit the API Tokens page.
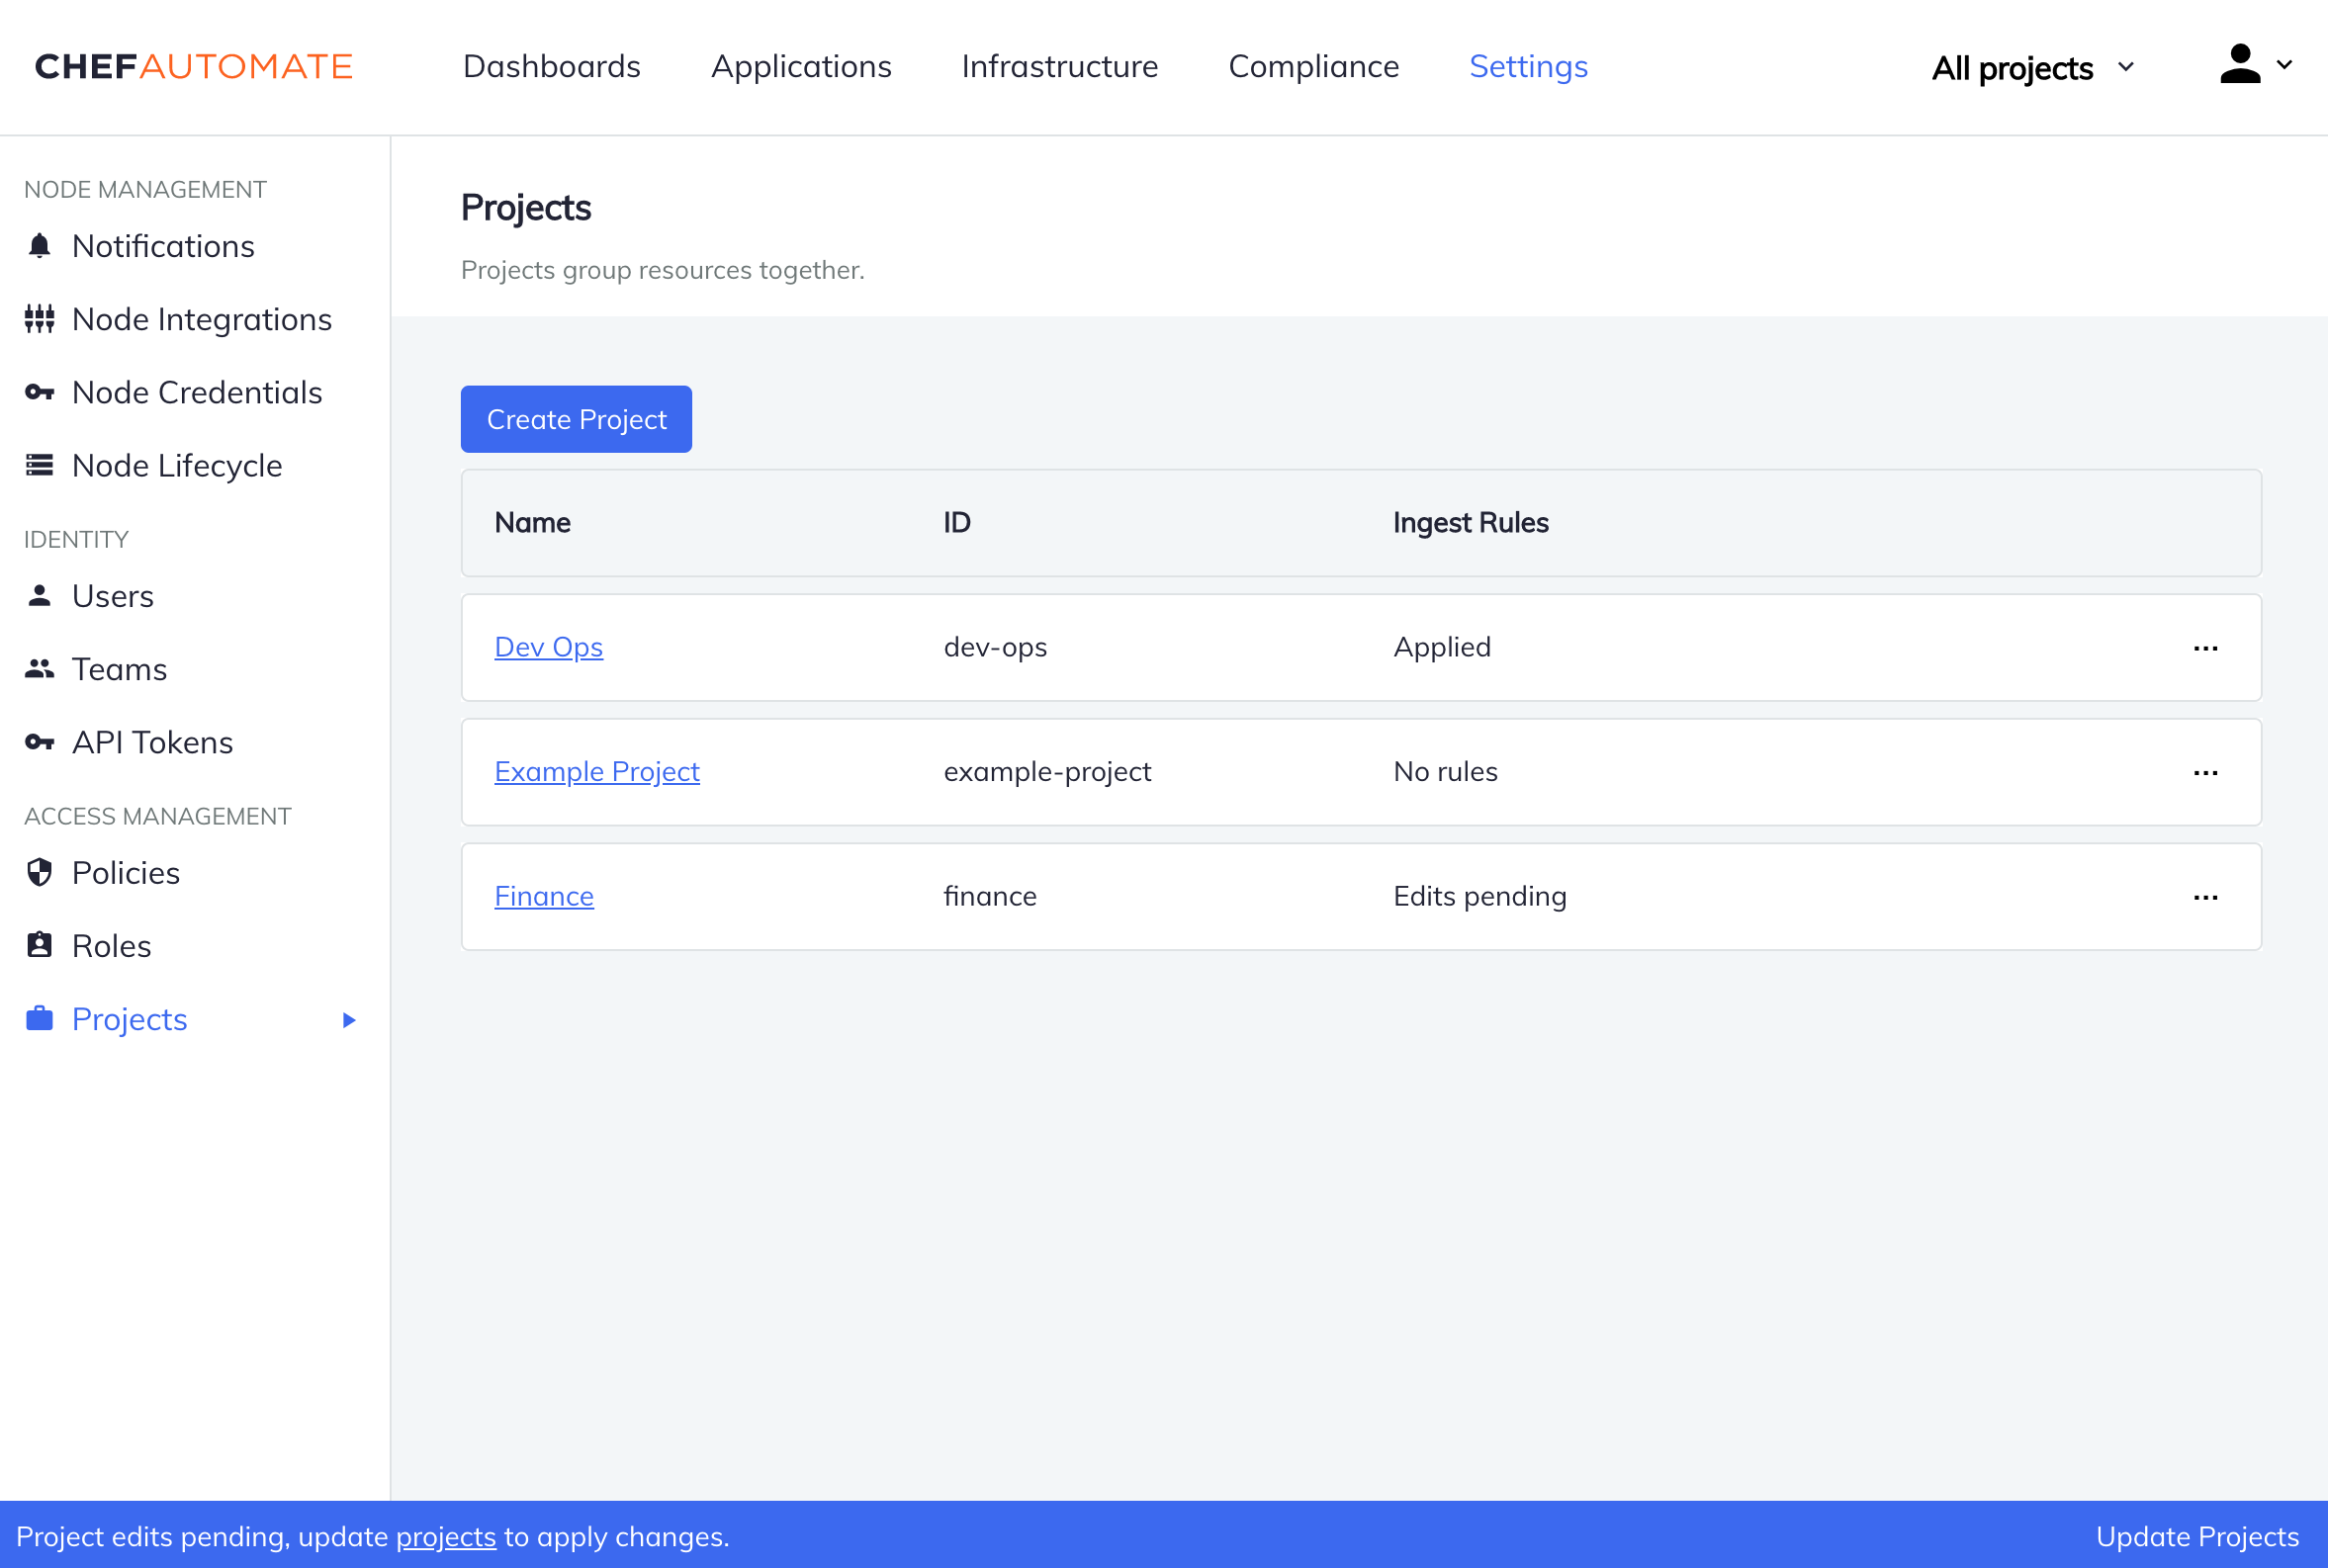
Projects
Projects are used to grouping and permission Chef Automate resources as well as ingested data, specifically Compliance reports, Chef Infra Server events, and Infrastructure nodes.
Projects can be managed via the Projects list under the Settings tab and consist of an ID, a proper name, and a drove of ingest rules. Project ingest rules are lists of conditions used only when assigning ingested resource to projects, and then they are not relevant when assigning IAM resources such every bit teams or roles.
Configuring Project Limit
By default, Chef Automate limits you to 300 projects. You can increase the project limit using the command line.
Offset, write the file with your new projection limit:
cat << EOF > authz.toml [auth_z.v1.sys.service] project_limit = <desired-max-projects> EOF So, update the existing Chef Automate configuration:
chef-automate config patch authz.toml
Note: As a event of increasing the project limit, you may see slower loading times in the UI.
Creating a Project
To create a project, navigate to the Projects listing under the Settings tab and select Create Project. You will need to provide a name and can optionally edit the ID. You lot must create a project before you can assign whatsoever resource to it.
When you initiate the project cosmos, the arrangement creates the project, but also three supplemental policies for your convenience:
| Policy Name | Policy ID | Associated Role |
|---|---|---|
<project-name> Project Owners | <project-name>-project-owners | Project Owner |
<project-proper noun> Projection Editors | <project-name>-project-editors | Editor |
<project-proper name> Projection Viewers | <project-name>-project-viewers | Viewer |
These policies are discussed in more than detail in Project Policies.
Assigning Teams and Tokens to Projects
Projects tin be assigned to Automate-created teams or tokens on creation or update.
To assign a squad to projects, select a team from the Teams listing, and then select Details. Likewise, to assign a token to projects, select a token from the API tokens list, so select Details. In either case, you lot tin select projects from the projects dropdown to assign.
You may too assign teams and tokens to projects on creation. In the creation modal, select any projects to which the new resource should vest.
If you would like to delegate buying of a projection to another user and then that they may assign resources, you will want to brand that user a Project Owner of that projection.
Assigning Ingested Resources to Projects
While Automate's local teams and tokens can be directly assigned to a project, ingested resource must be assigned to projects using ingest rules.
Project ingest rules are used to associate ingested resources with projects within Automate. An ingest rule contains atmospheric condition that determine if an ingested resource should exist moved into the dominion's project. Each condition contains an attribute, operator, and value. See IAM Project Rules API reference for details on how to manage projection rules.
In this example, after creating a project with the ID project-devops, you will add an ingest dominion to this new projection. You will update projects to apply this new project rule, causing all matching ingested resource to be associated with projection-devops. You volition so use the global projection filter to filter your ingested information by projection-devops.
First, determine which ingested resource should belong to the project. In this case, we want to add the following ingested resources to project-devops:
- Compliance reports with Chef Organization
devops - Infrastructure nodes with Environment
devand Chef Tagdevops-123 - Actions on Chef Infra Servers
devops.pizzaordevops.dog
Y'all may want to verify that those filters work as expected on the Outcome Feed, Client Runs, and Reports pages.
Navigate to the project details page of projection-devops, past selecting the projection name on the project list folio.
Select the Create Rule button to create a new projection rule. Choose the resource blazon Node, then make full in the first condition's fields. Feel free to create fake ingest data that corresponds to the example json beneath, or come up with a condition that matches your existing data ready.
Alarm
Compliance reports must be using inspect cookbook 7.5+ in club to make apply of all of the bachelor projection rule attributes. Older reports will only have Environment and Chef Role bachelor as attributes.
{ "id": "devops-rule", "name": "devops rule", "type": "NODE", "project_id": "projection-devops", "conditions": [ { "operator": "EQUALS", "aspect": "CHEF_ORGANIZATION", "values": [ "devops" ] } ] } 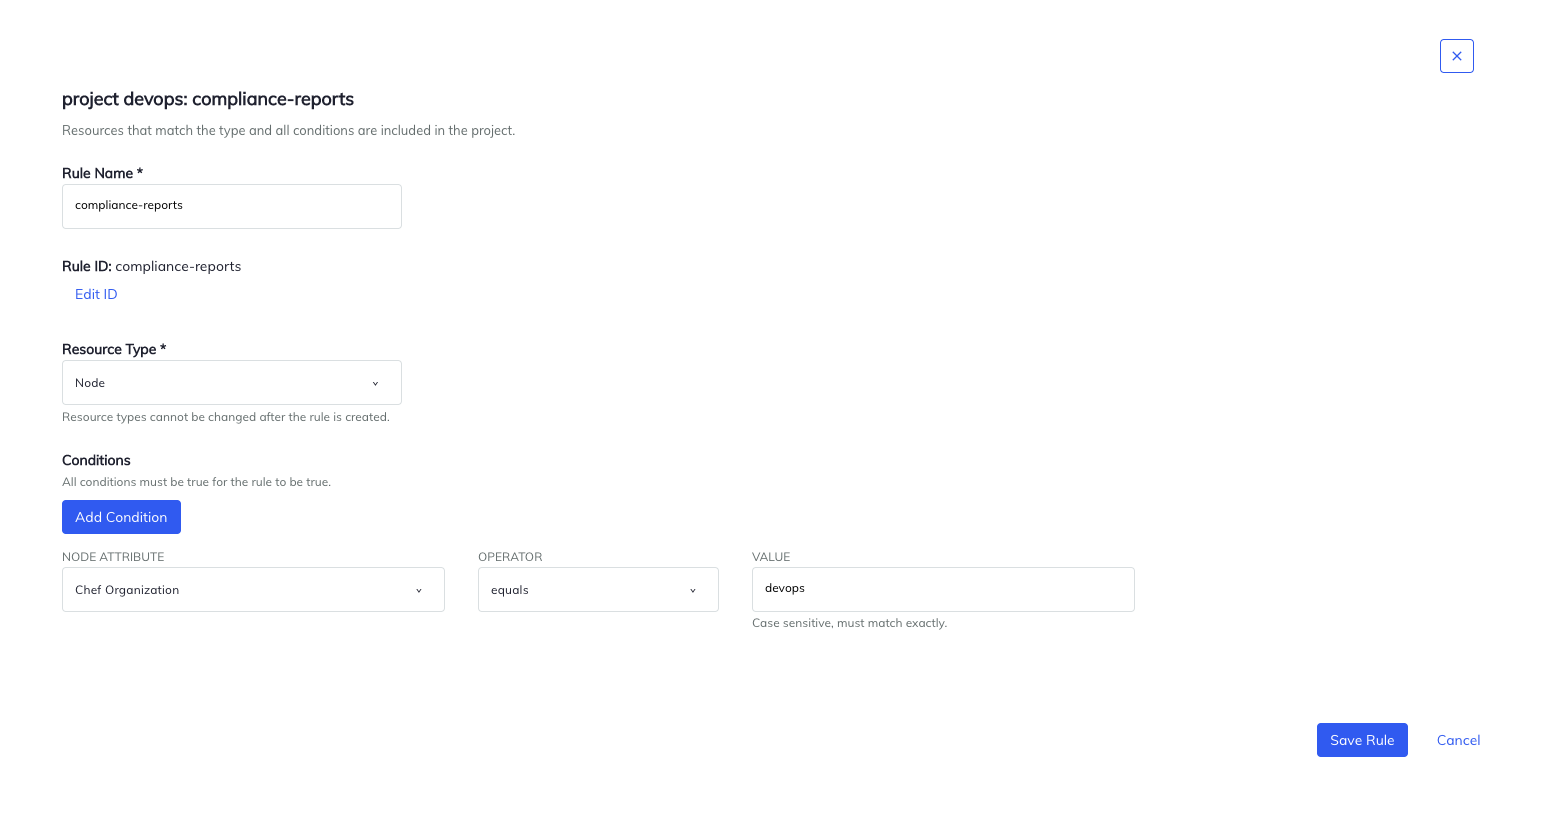
Salve the dominion. If y'all later need to change the name or the atmospheric condition, select the project rule name on the project details page.
When edits are pending, a banner will be shown at the bottom of every page. Selecting the Update Projects push on that banner will apply those changes.
Updating a project begins an operation that applies all awaiting dominion edits and then moves ingested resources into the correct projects according to those latest changes. An ingested resource is moved into a projection if it matches at least one of the project's rules. In this example, upon successful update, all ingested resources whose Chef Organization matches devops volition exist considered a part of the project project-devops. Only these resources will appear in Automate's dashboards when the project-devops project has been selected in the global project filter.
A percent count appears in the bottom imprint while the operation takes place. You may abolish the update at any time by selecting the Stop Project Update button in the banner and confirming the cancel in the modal that pops up.
Alarm
Avoid stopping an update unless absolutely necessary. It will leave your system in an unknown state where but some resources have been moved into their projects while others still remain in quondam projects. Only another successful update volition restore the system to an upwards-to-date land.
In one case rules take been successfully applied, the imprint will be dismissed until the next time there are awaiting edits to any project.
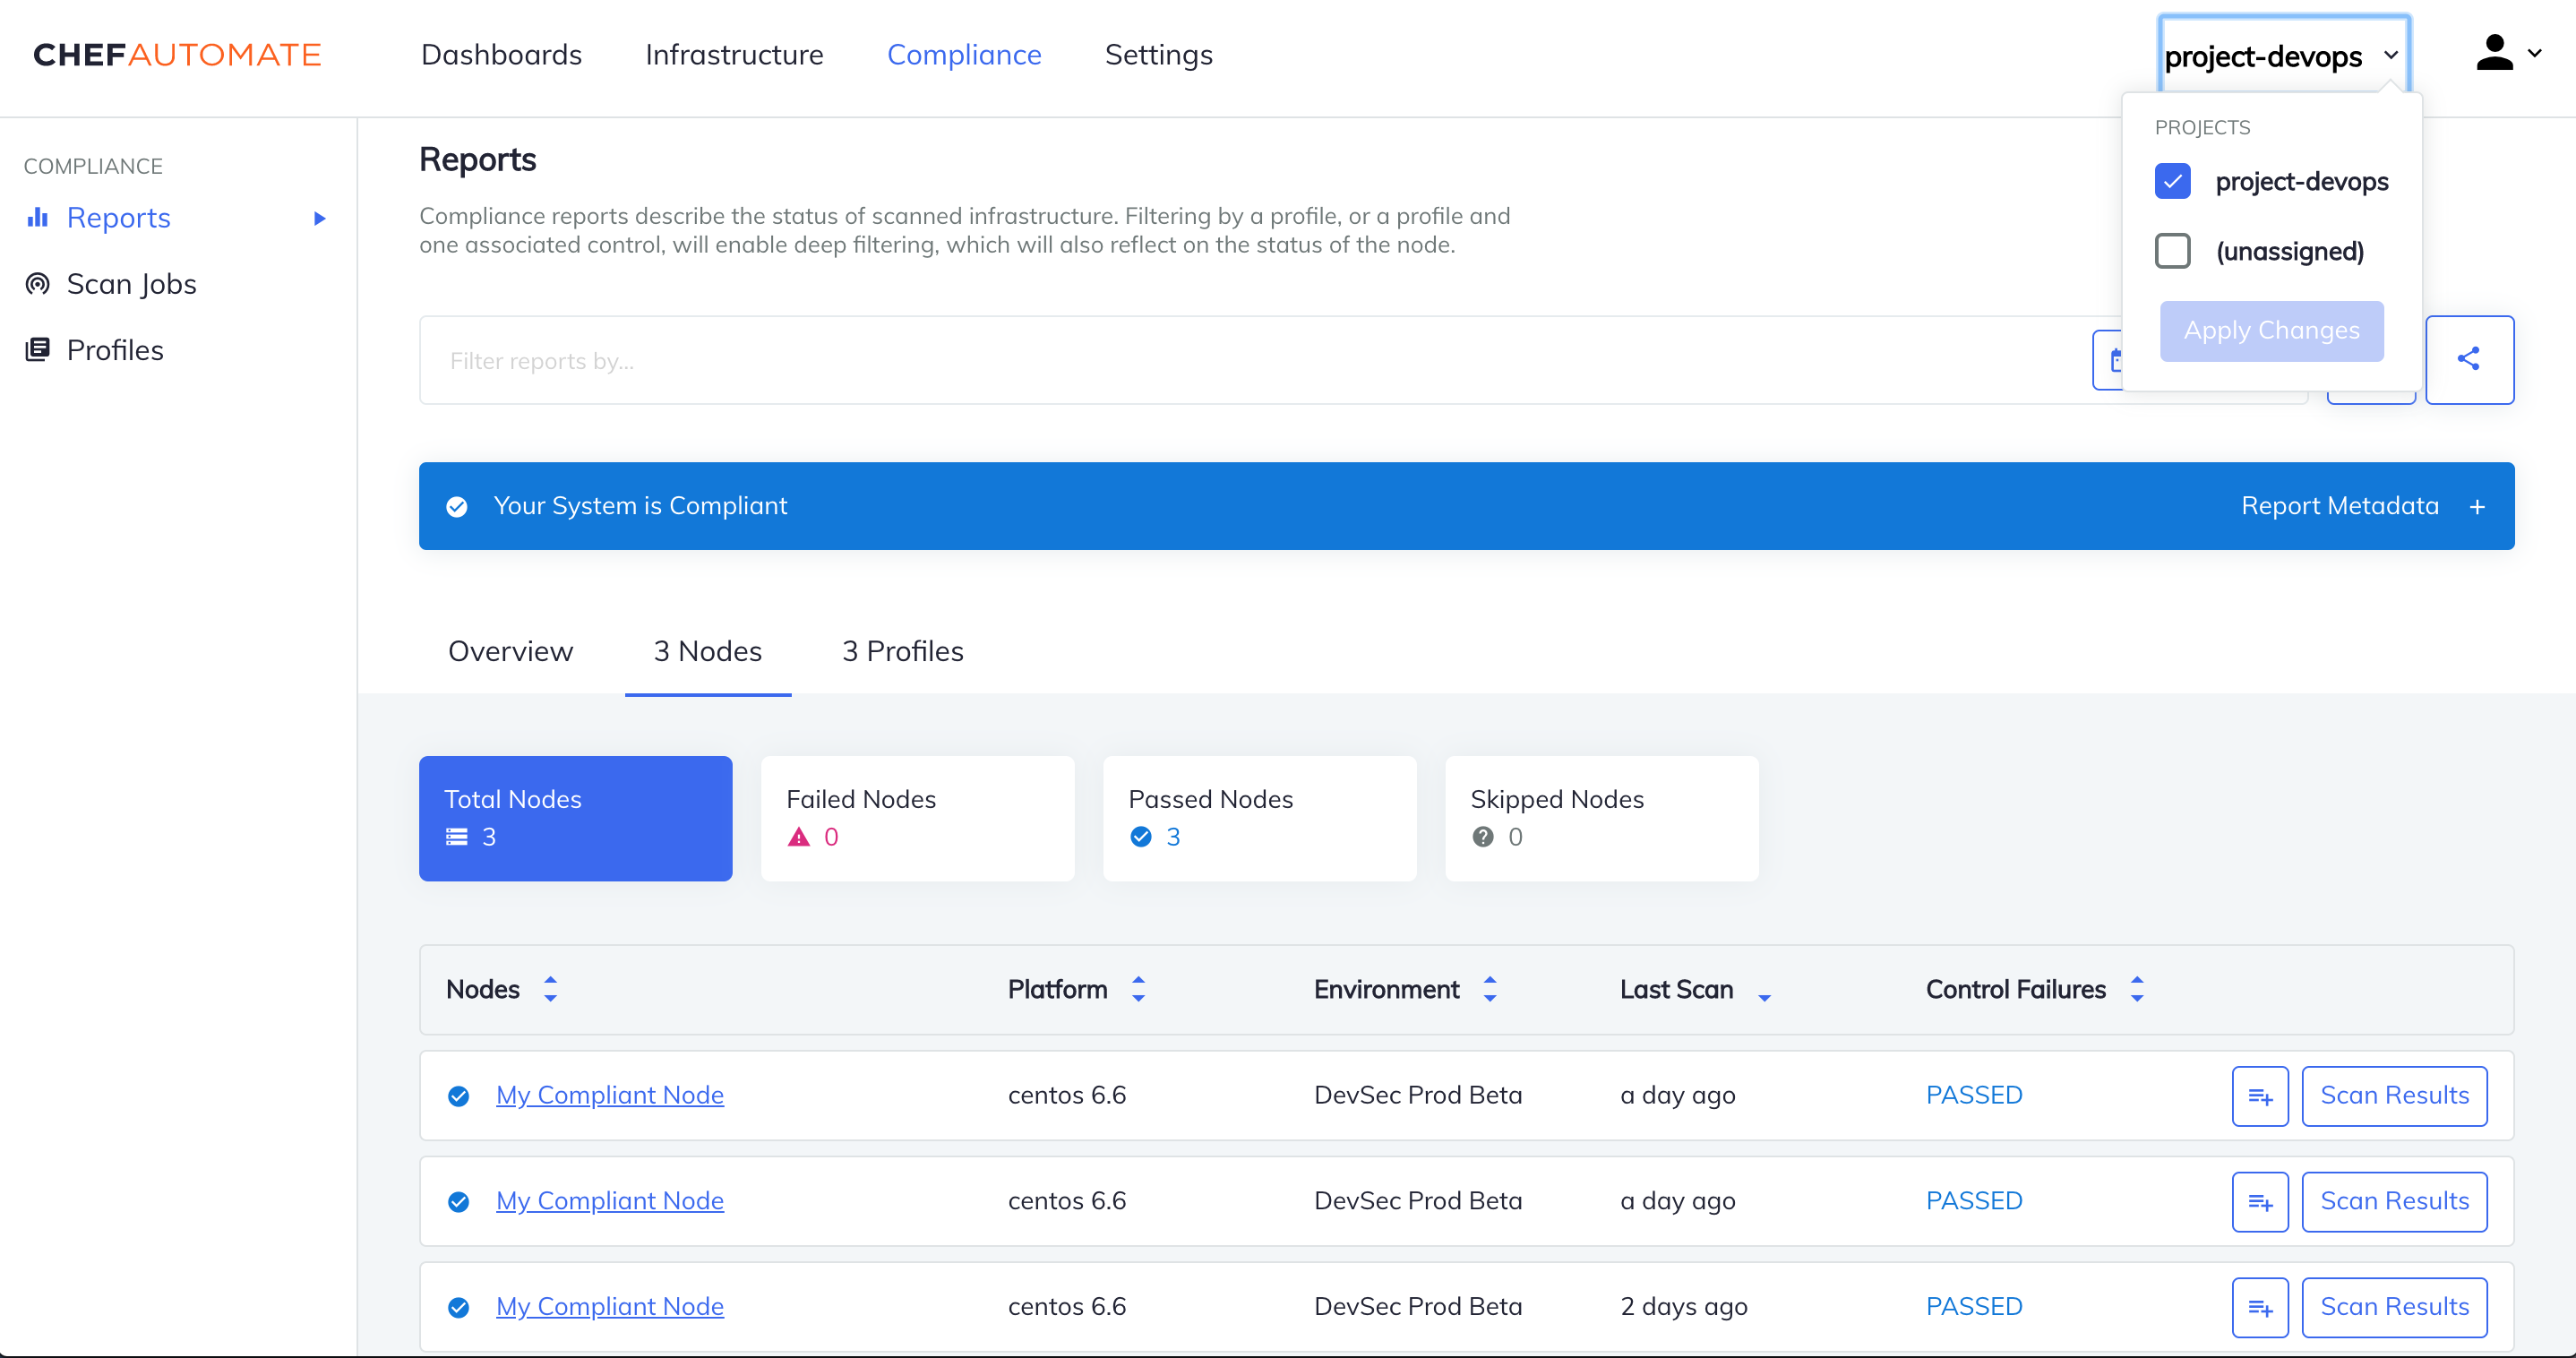
To verify that the ingested resource have been moved into the correct projects, select project-devops in the global projects filter, which is on the top navigation. The data in Automate filters by the selected projection-devops project. In this example, the effect is revealed by navigating to the Compliance Reports' Nodes tab, which simply features nodes that belong to the devops Chef Organization.
Now that we have the first prepare of our ingested data associated with our new project, let u.s.a. add together another status and a new dominion to add more data to project-devops.
Note
Compliance and Infrastructure ingested resources are not the exact aforementioned nodes, so their properties may not be the same. Separate conditions governing said resource may demand to be used if their properties practise not match exactly.
Note
Ingested events require conditions of Event type to be associated with the right projection. A condition of blazon Node will not match an outcome, even if the status'south operator, attribute, and value all match exactly (and vice versa with Event project rules and nodes).
Render over again to the projection particular page and create two new ingest rules past selecting Create Rule. Creating new rules will aggrandize the data ready under project-devops, because an ingested resource demand only match 1 dominion to exist placed in the project.
The offset rule should contain ii conditions. Fill in the kickoff condition with attribute Environment, operator equals, and value dev, or any value matching your data set. Select Add together Status to add another status with attribute Chef Tag, operator equals, and devops-123. Relieve the rule.
Note
Adding atmospheric condition further restricts the ingested data because every status must be true for an ingested resource to exist placed in the project.
For the 2nd dominion, choose resources type Event. Fill up in the first condition with attribute Chef Server, operator member of, and value devops.pizza, devops.domestic dog, or any values matching your information set up.
Setting the projection rule Resource Type determines what condition attributes are available to select. Issue dominion atmospheric condition tin can just have the attributes Chef Organization or Chef Server.
Rules of type Node can take atmospheric condition with attributes Chef Organization, Chef Server, Environment, Chef Role, Chef Tag, Chef Policy Name, Chef Policy Group.
Select the Update Projects button from the bottom imprint. Upon completion of the update, y'all should be able to filter by project-devops beyond Automate's dashboards and meet only the ingested data that you expect.
Effortless Infra Projection
To create a projection that contains all Effortless Infra nodes, create a ingest dominion with resource type Node and a status that uses attribute Chef Server, operator equals, and value localhost.
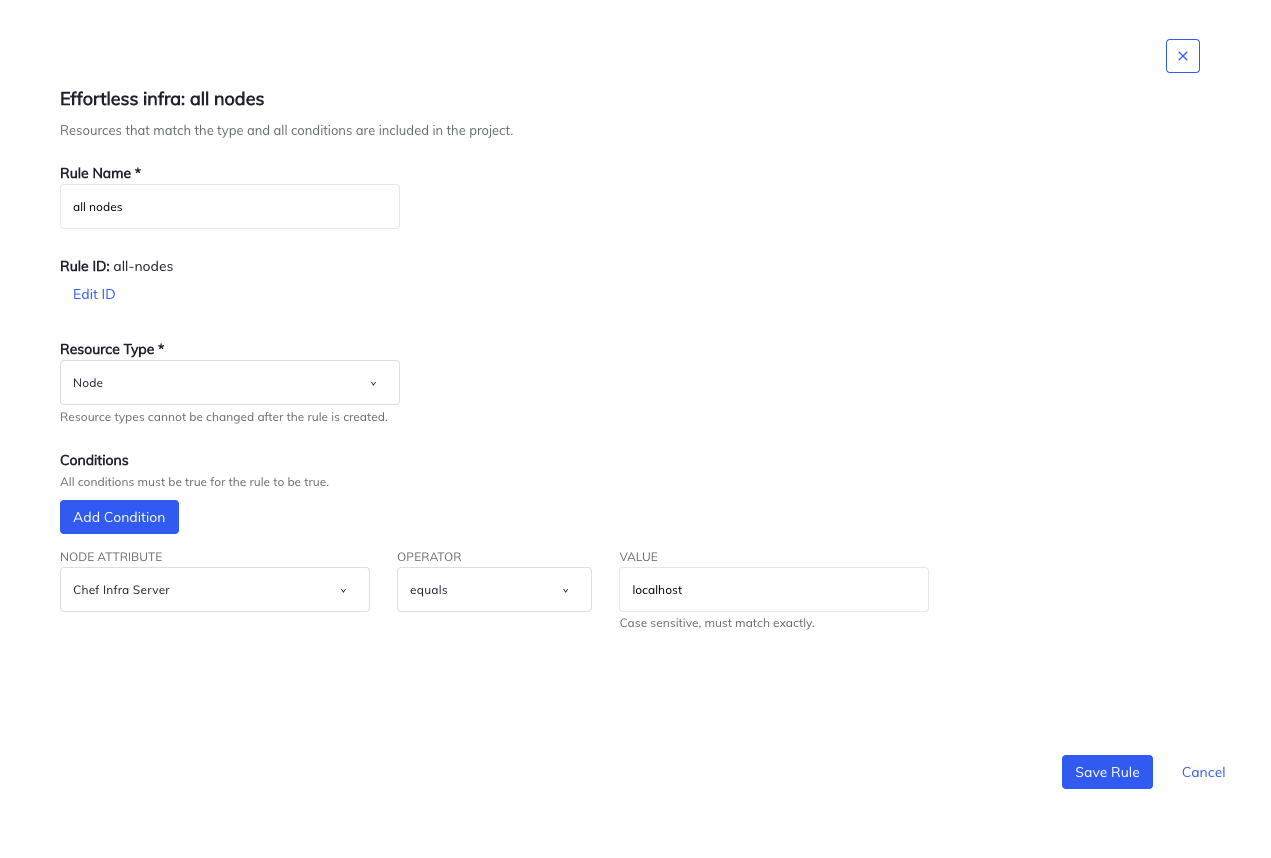
The above rule matches on a node's Chef Infra Server field, which is gear up to localhost. This dominion works because all Effortless Infra nodes list the Chef Infra Server attribute equally localhost.
If desired, create subgroups of Effortless Infra nodes by calculation a second condition that matches a specific Chef Policy Name.
Project Policies
When you create a projection, Chef Automate automatically creates three supplemental policies. This adjacent table further describes the roles associated with these policies.
| Policy Name | Office | Description of role |
|---|---|---|
<project-proper name> Project Viewers | Viewer | View everything in the projection except IAM |
<project-name> Projection Editors | Editor | Practice everything in the projection except IAM |
<project-proper noun> Project Owners | Projection Owner | Editor + view and assign projects |
Consider the Project Viewers policy, which uses the Viewer part. The same Viewer role is as well used in the default Viewer policy, which lets a user view everything in the system except IAM. Using the Viewer role in Project Viewers policy restricts the telescopic to your new projection, and users attached to your Project Viewers policy will be able to view objects only associated with your project.
Assume you named your project Devops, and have two users: Terry and Kelly. If Terry needs to view Devops-scoped resources, so add Terry as a fellow member to the Devops Projection Viewers policy. If Kelly needs the ability to edit Devops-scoped resources, and then add Kelly to the Devops Projection Editor policy.
When Terry is a fellow member of the Devops Project Viewers policy and not a member of any other policy, they will merely exist able to come across resources assigned to Devops. They will not be able to update or delete them. Kelly, however, will be able to update and delete.
See Policy Membership for more than data on policy membership.
Restoring Admin Access
While nosotros have safeguards to prevent information technology, it is possible to lock yourself out of Chef Automate. If y'all have root admission to the node where Chef Automate is installed, use the following commands to restore admin access:
This command resets the local admin user's countersign and ensures that the user is a member of the local admins team, which is a permanent fellow member of the Chef-managed Administrator policy.
chef-automate iam admin-access restore <your new password hither> Source: https://docs.chef.io/automate/iam_v2_guide/
0 Response to "Chef Increase Version in Inspec.yml Uploads Same Profile Twice"
Post a Comment